 | ||||
CREATING A SITEMAP
There are 2 types of sitemaps:
1. A web page that you create that provides visitors with a listing of every page within the site and has links to those pages. This is also beneficial for the search engines.
2. XML sitemap - This sitemap is code that is inserted into the root directory of your site to make it simpler for the search bots to travel through your site and index the pages. You can submit your xml sitemap to Google by creating a Google Account and using the Webmaster Tools. It makes the process easier if you create the Google account first and then proceed with making the xml sitemap. Tutorial for creating a Google Account.
Create a new page in SiteBuilder.
Title it SiteMap
Use text boxes and enter the name of each page within the site. You can add a brief description of the key pages or just the page names. Link each of those to their respective page in the site. Add a text link on at least the Home page to your SiteMap page.
Example 1: Sitemap Page
Example 2: Sitemap with descriptions
Go to xml-sitemaps to generate an xml sitemap for your Homestead site.
Follow the steps shown on the page to create your sitemap. Recommended settings are:
- Enter your full site address - if you use the www be sure to include it and if you don't be sure to leave it out.
- Change frequency - Monthly is adequate unless you are updating on a more frequent basis. Don't try to 'game' the system by selecting daily (unless you do) as that can work against you.
- Last Modification - Use server's response
- Priority - Automatic
- You should then see something like: Manage http:// your site name and to the right of that a link to Add a Sitemap. Click on that link.
- You get a drop down box asking you to Choose Type. Select Add General Web Sitemap
- A list drops down and there is a space for you to fill in the address of your sitemap.
If all has gone well in placing the file in your directory the address should be:
http://www.your site address.com/sitemap.xml
Having done that you should receive a message telling you that 1 sitemap has been added.
If you receive an error message it is probably due to having imported the .xml file you created into the wrong place - it has to go in the root directory in order for Google to find it.
Once the sitemap has been generated you will see a screen like the example at right.
Step 1 - Click on the link 'here' and save the file where you can easily find it. The desktop is always a good choice!
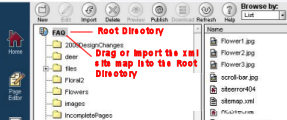
Open SiteBuilder and either import the file or drag it into your file. It needs to be placed in the root directory in your File Manager in SiteBuilder.
Publish the file.
TIP:: If you add or delete pages in your site be sure to create a new site map. Delete the old site map from your root directory and add the new one. Publish. Resubmit it to Google in your Webmaster account.

Was this tutorial helpful?
Suggestions/Comments
Copyright 2006 - Homestead Connection - All Rights Reserved
Homestead Website Design and SEO - S&J Enterprises
Step 2 - Click on the link that reads "Google Webmaster Account".
The root directory is your 'file cabinet'. The site map file is placed in the main 'cabinet' - not in any of the files. Highlighting the root directory, in this case FAQ, will show you a list to the right of all the files residing in that directory.
If you use the Intuit SiteBuilder vs Homestead SiteBuilder read the special instructions for creating an xml-sitemap before you continue. Also, Intuit users log in to accounts at www.intuit.com rather than www.homestead.com
SPECIAL INSTRUCTIONS FOR INTUIT USERS OF SITEBUILDER
The xml-sitemap generator does not always recognize Intuit's ISP
If you receive an error message that "There was an error while accessing the URL specified" check your site at:
If no information is generated under HTTP headers found in response and Raw HTTP Headers then add Intuit's ISP to the address where it asks for Starting URL on the sitemap generator page.
Example:
http://www.yourwebsiteaddress would become
http://www.yourwebsiteaddress/|209.157.71.190
Use the internal search feature to the right or the site map for easy access to information.
| ||||
NOTE: